I am not keeping up with the blog recently. Apologies. Realistically, I’ve gone dark for longer before. That whole 5 months I lived in Seattle between Japan and Korea I wrote maybe one post, but I also didn’t have much to write about back then. Now I have 33 drafts sitting waiting for me to work on them, and yet when I open them I just sigh. I did not do a good job taking notes on my summer holidays. I don’t have 4 hours of enforced desk warming at work every day anymore. I have these lovely three day weekends and I can’t bring myself to spend even one of them writing in here. Nanowri-no-mo. The writers block is strong.

I’ve been working on my winter travel plans, which involves reading a lot of other people’s travel blogs. I see a lot of blogs that will do an entire 10-12 day trip in a single post of no more than 2,500 words. It is a great way to summarize a trip and pass on the most vital information to future travelers, so I’m not dissing those folks at all. In many ways I envy them, because my task would no doubt be easier were I to adopt a similar approach. I might even have more fans since “in depth” reading requires an attention span that is not popular in the world of click and scroll. Which, I’m also not dissing. I love scrolling thru my FB feed as much as the next person. However, when it comes to my own content, I want to be able to tell a story. I like telling stories.
It does not help that this semester’s schedule has been a little extra brain taxing, leaving me with less mental spoon-power at the end of each teaching day to sit down and organize a blog post. Three more weeks! I’m staying at this job, don’t worry. I worked way to hard to get it to leave, but I am looking forward to having a chance to get a new schedule for spring semester.
Art History
The good news (for me anyway) is that I haven’t merely crawled into a cave to binge watch Netflix (although I have done some of that as well… like maybe the entire Star Trek catalogue except for Enterprise causethatonesucksfiteme). I have finally reopened my artistic cabinet. Before moving to Saudi Arabia (and thus before starting this blog) I went through a few art binges in my life. In high school and undergrad I was massively prolific. Reams and reams of sketch pads filled, art given as gifts to everyone I knew, and even occasionally sold to strangers for profit!
Then I stopped. For years.
After finishing my MA and getting back from China, I finally picked up the brush again. It helped that I had some peers to do art with. Going over to a friend’s house to paint and drink tea (or wine) is a lot of fun, and it took the pressure off me to PRODUCE. I finished paintings that had been half done for years. I started new ones. I updated older artwork from my high school days to reflect my new style. I was feeling it.

Then I moved, and all the art went into storage. Saudi was… well, you can read the blogs, but I did my last real piece of art there when I made the life size paper Christmas tree to adorn my hotel room. I made every piece of that from paper and foam because Christmas decorations are forbidden in Saudi. That was in 2014. Since then I’ve had art supplies laying around. At least a sketch pad and pencil. People who knew I liked to make art would give me things as gifts and slowly I accrued watercolors, acrylics, brushes and canvas and they just sat on a shelf.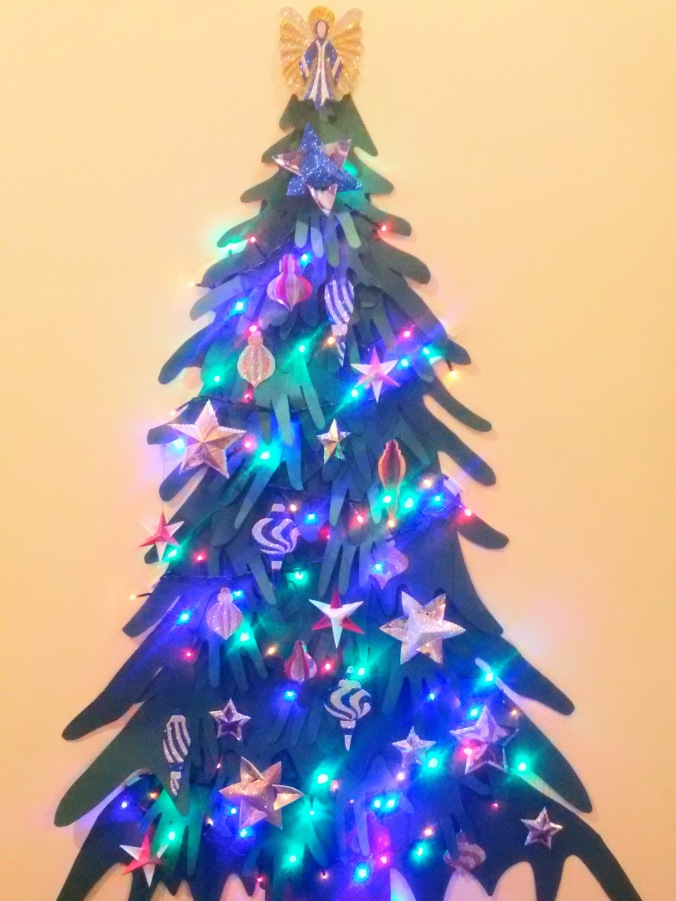
Returning from Europe this August, all my Korea friends were finally gone. Those who didn’t leave in February (the end of the school year) left over the summer. I knew I had to make myself get out and be social in order to avoid the cave-dwelling-Netflix-binge fate. Public “foreigner” events are the best way to go since we all show up expecting to mix and mingle, but I live over an hour away from the two nearest cities with decent expat populations and I knew I needed more than just “socialize” as a motive to travel so far. So I joined some art classes.
Specifically, watercolor. These are much more social than educational, but I did end up learning some new techniques as well as just getting a chance to chat with people. The first one I went to in Busan and everyone pretty much split as soon as it was over. The second one was in Daegu where I ended up spending several hours after the class hanging out and chatting. So far, no lasting friendships have been formed, but I had a good time regardless.
Art Spark
I also triggered my art spark. During the last couple of months I’ve delved much more into making art than into doing photography or writing. As a result, my Instagram and Blog are feeling a little neglected. The first piece I started was a simple mandala pattern on acrylic. I spent about an hour looking at mandalas on Google Image search and then sat down to draw my own. Once the pencil sketch was done, I transferred it over to a canvas by carefully measuring over and over. It’s much easier to make a mandala in a computer where you can just copy and paste for symmetry. I also used a black marker to show the main lines. I basically created an adult coloring book page on a canvas and then started using acrylic paint to “color” it.


I wish I could say I was finished, but it turns out that coloring in acrylic isn’t as fun as coloring with pencils, crayons or markers. I also struggled with color. I repainted part of the outer ring twice, and the middle ring 3 times. I have since taken a digital version into Pixlr and experimented with color schemes for the middle ring. At least now I know what I want to paint there… One day, I might even do it.
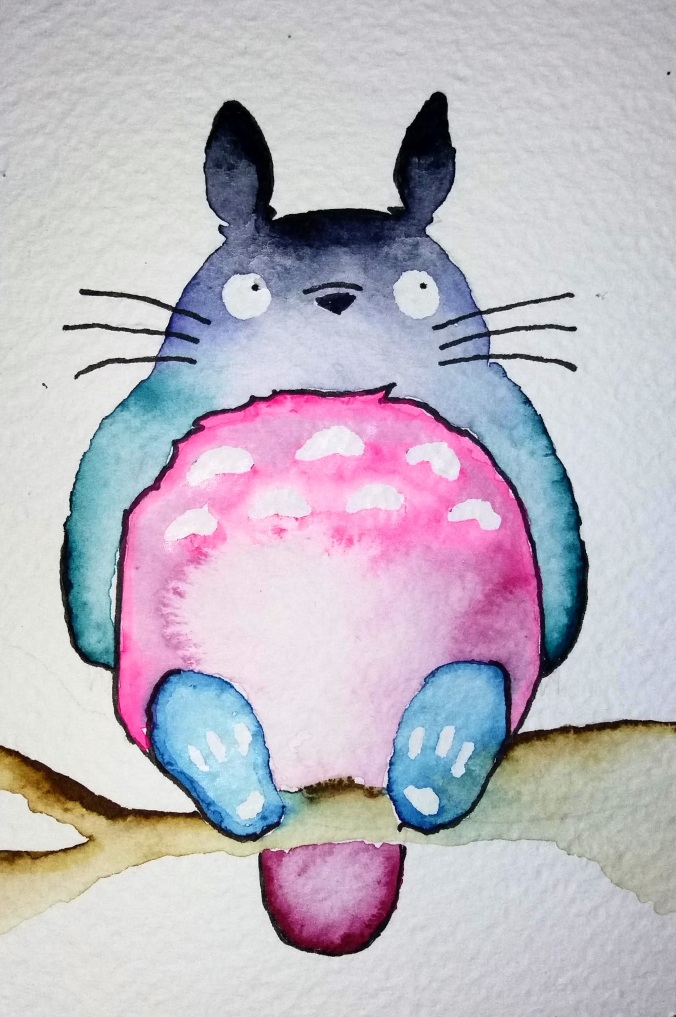
One day when I was tired of meticulously painting inside the lines, I decided to pick up the sketch pad again. I liked the idea of the mandala, of the adult coloring book style, and decided to try to make a mandala animal pattern. Back to Google Image search. I scrolled through a few hundred designs before realizing my favorites were the jellyfish. I have no idea why. Not wanting to copy the poor unattributed artist whose work I was seeing plastered all over cheap t-shirts, Etsy pages and Pinterest boards, I decided to make my own!
I stuck the Star Trek on auto-play and went to work on my sketch-pad. A while later I had the finished design. Most people will recognize it’s extreme similarity to the adult coloring book fad. That is totally on purpose. However, when it came time for me to imagine how to colorize my drawing, I didn’t like the idea of repeating my mandala with acrylic paint experience. Visualizing a few mediums while I lay in bed cradling my chronic insomnia, I hit upon the idea of using colored paper to bring my creation to life!
The next day I found a local art store which was overrun with paints and painter supplies as well as the standard Korean “stationary store” supplies like colored pens, and poster board paper. I was never able to find things like wrapping paper, brown paper lunch bags, construction paper, tissue paper or any of the other staple craft supplies I grew up with in America, let alone any of the new craft supplies that my niblings get to play with. Maybe in Seoul there is a shop that has them, but not here. The only patterned and colored paper I could find was for origami. I bought a half a dozen different design packs and a decent sized canvas. There was also no such thing as decoupage glue or mod-podge, so I got plain white glue and made my own by mixing it with water. Old school.
I didn’t want my bright colored jellyfish alone on a white canvas, though. What do do for a background? Paint it blue with acrylics? No… I really wanted a watercolor effect, but I didn’t have confidence in my ability to do it, especially not on a canvas. I decided to make the watercolor on paper and decoupage the background as well as the foreground.
Paper-cut Redux
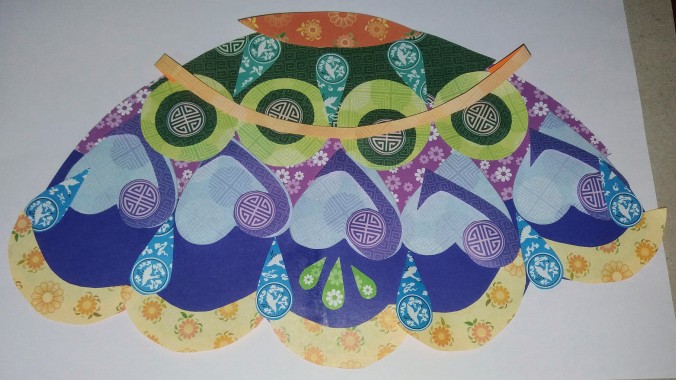
I cut circles in various sizes, hoping to evoke a “bubble” feeling. I then spent hours (more Trek bingeing) painting them in pale shades of blue and green.
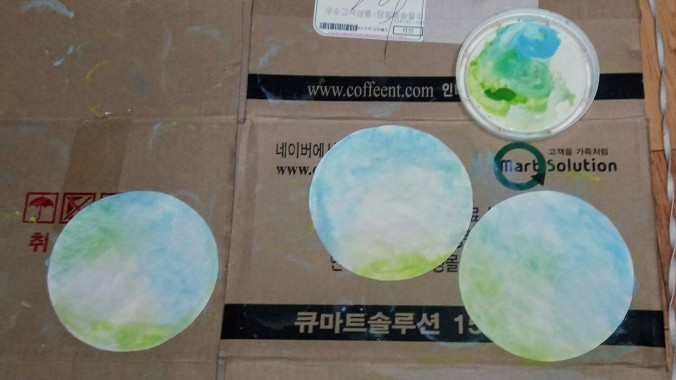 It was worth it. When I finally was ready to create the background, I placed the different sized circles around the canvas. I painted them in layers, mixing a little white paint into my glue/water mix so that the bottom layers would fade a little compared to the top layers and give it some depth. Originally, I thought there would be distinct bubbles against a white background. In the end, the whole canvas was covered and it reminded me of Monet. I tell you, I loved that background so much I almost didn’t want to put anything on it. I will definitely be using that technique again.


For the jelly itself, I started off by cutting the pattern from plain white printer paper (abundant at my office). I used the canvas to make sure the pieces fit and I had to make some changes from the original drawing to accommodate the new size and materials.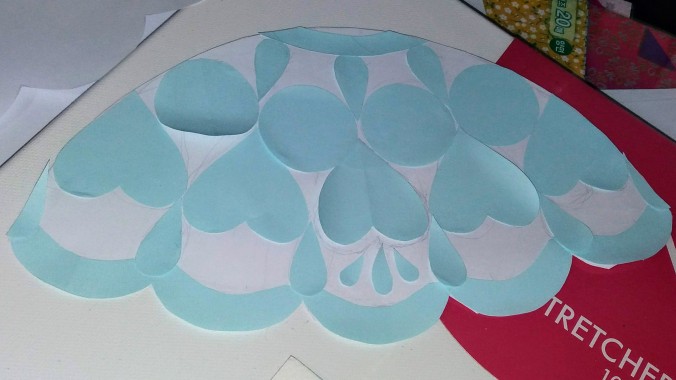
When I had the tentacles and body shape done, I used post-it note paper to measure and cut the patterns on the body. It was much better than plain paper because I could make sure they stayed in place while I added other shapes. I had to change the size of the heart shapes because the first attempt was too small. Being able to stick them to the body let me clearly see how the shapes would look glued down.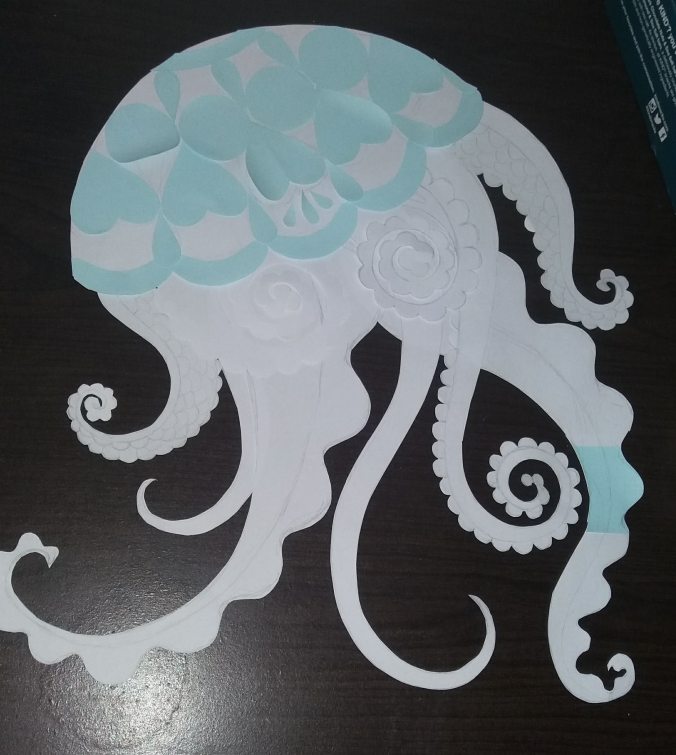
Finally I was ready to cut the colored origami paper. Sort of. First I had to decide which pieces got which colors and patterns. I had a limited amount, no more than two sheets of each type and remember origami paper isn’t exactly big, so for larger chunks, I had to line up the two sheets along their pattern to make it seem, well, seamless. I also had to balance the colors and shapes in my head.
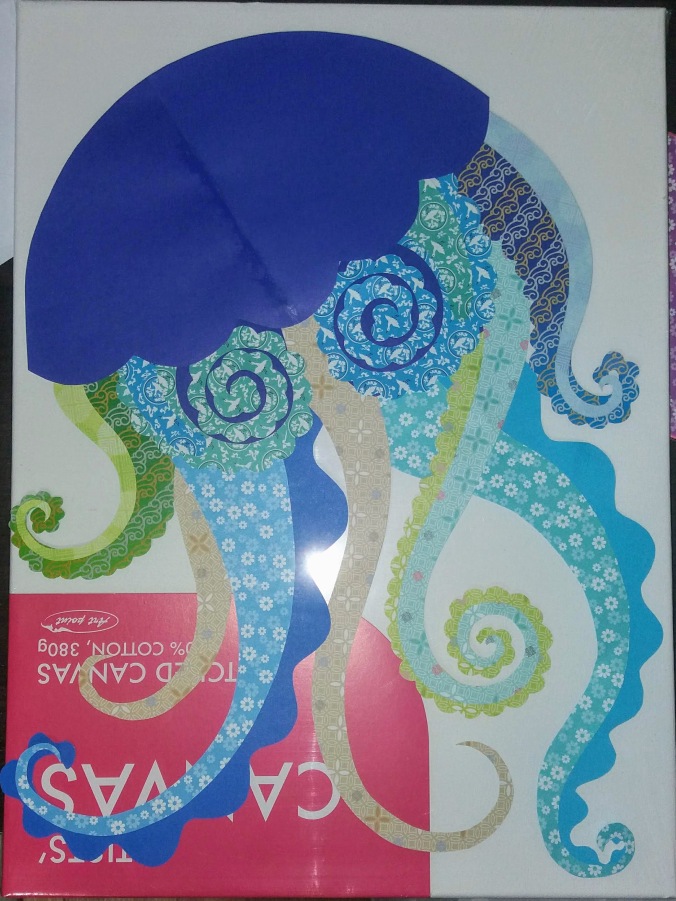 When I made my final color decisions, the last of the cutting was ahead of me. I had to trace the white paper stencils onto the origami paper and faithfully cut each shape and each layer. The tentacles were actually fairly easy, but the accents on the body were the most challenging. Here again the sticky paper came in handy since I could just stick my stencil to the colored paper rather than try to hold it down. I also enjoyed using the designs on the paper like using the pink circles on dark green to make the circle centers, or using those same patterns on the purple to accent the hearts. Not only cutting the shapes I needed, but cutting them around the patterns.
In the end, the gluing required more patience than I could have imagined! I had to be very gentle with the wet paper. It wasn’t just gluing pieces down, but using the watered down glue like a paper mache. The paper would be wet and tear easily. However, if I didn’t soak the paper evenly, it would pucker and wrinkle badly in response to the areas touched by glue. I added only one or two pieces at a time and had to wait (more Star Trek) for them to dry at least most of the way before applying the next.

Damp pieces were adjustable, but only a little. If I hadn’t planned and checked everything while it was dry, I don’t think I could have assembled it wet. It was a whole new experience. I’ve done paper mache and decoupage but never to create a 2d art of my own design, and on a canvas no less. It took me 3 weeks of working on it in my spare time.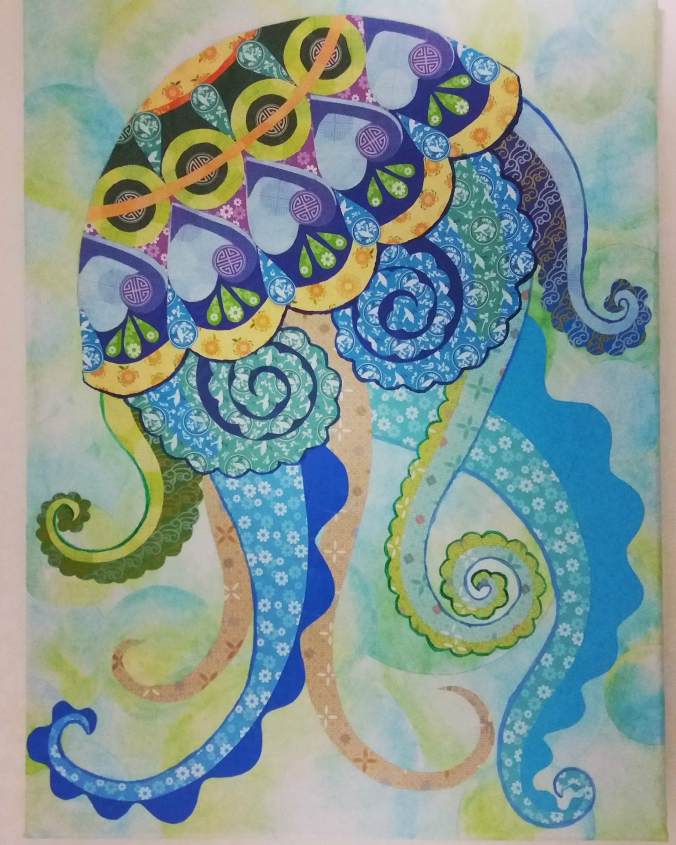
And that’s why I haven’t been writing…
